Lowering Action at the Saddle
© Frank Ford, 6/21/00; Photos by FF, 4/20/00
As low as possible without buzzing.
That's the general request by most of us musicians, who really don't want to be working harder than necessary to mash the strings down to the frets. After all, we're repeating those left hand maneuvers over and over, sometimes hours at a time. A few thousandths of an inch can spell the difference between success and tendonitis.
One of the biggest problems in setting up your guitar is that there are no really concrete measurements. Sure, there are factory standards, but those can't take into account that we all differ in our needs. The way you hold a pick, the volume at which you play, the scale length, the gauge of strings, and many other factors influence the performance of your guitar. So, at least to some extent, it would be advantageous if you could make adjustments in action yourself, so you wouldn't have to take your guitar to the shop for small incremental changes.
In years past, there have been attempts to produce an adjustable bridge, but these efforts have always resulted in a less than satisfactory sound. The most memorable of these were made by Gibson:
While most of the adjustable bridges weren't as clunky as this Dove's Tune-A-Matic bridge, they all impaired tone more than we were willing to tolerate. So much for user-friendly action adjustments.
But, if you are stout of heart and at all mechanically inclined, you can make some of your own action adjustments without getting into too much trouble. If your guitar has a pickup with an element under the saddle, you might want to reconsider making your own adjustments. It is relatively easy to mess up the saddle-to-pickup contact and/or damage the element itself.
As I write this article, I'm assuming you have read over some of my earlier pieces on truss rod adjustment, bridge and saddle configuration, and neck angle diagnosis. If it seems as though I've assumed too much, don't forget to gaze through some of the articles you'll find on the big Index Page.
Presuming the truss rod is set correctly, and that the action at the nut is acceptable, virtually all action adjustments are made at the saddle. (The truss rod does affect playing action, but it is not there for adjusting action. Once set correctly, it is unlikely to need changing.)
As guitars age, the action generally rises. The top bows upward, the upper "shoulders" rotate forward a tiny bit, allowing the neck to pull up a bit. That's why most of the time, adjusting action means lowering action.
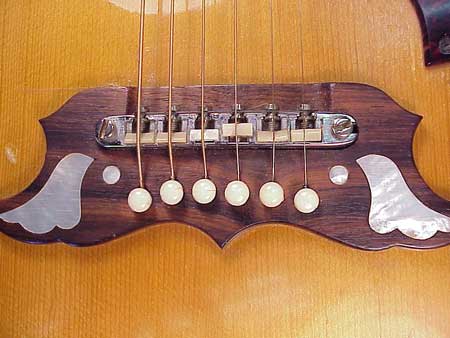
If your bridge is healthy like this one, and has a reasonably tall saddle, you can lower the action safely without incident:
If there's very little saddle sticking up above the surface of the bridge, you may need to consider whether it's time to reset the neck or whether it makes sense to cut the wooden part of the bridge lower in addition to lowering the saddle.
I hope I've gotten all the "caveats" out of the way by now. Here's a general procedure for lowering the action on an otherwise healthy guitar. This instrument, by the way, is a Santa Cruz model H.
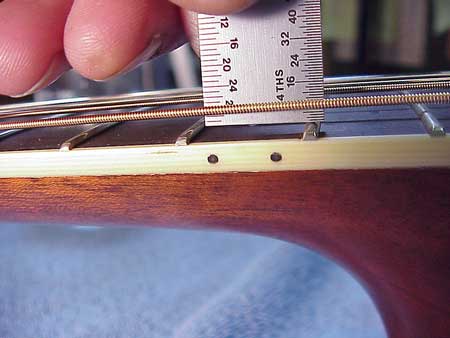
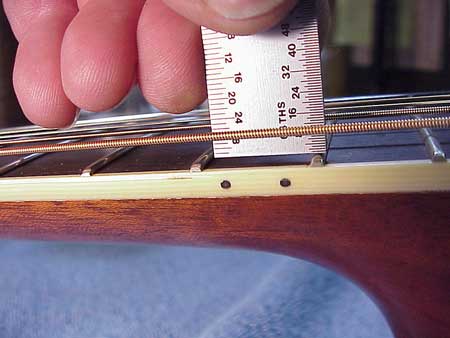
As you can see, the action measures a stout 8/64" at the twelfth fret, measuring the space between the bottom of the string and the top of the fret:
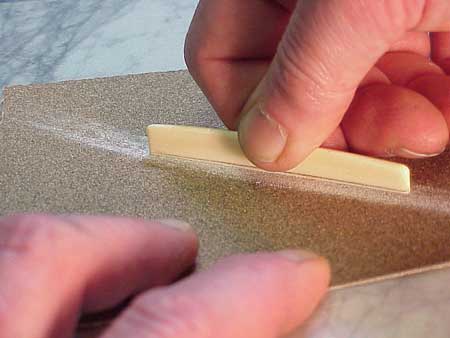
As a rule, I try to work with 1/64" increments when adjusting the action. In this case, I'd like to lower the action to 7/64."
If the action is to go down 1/64" at the twelfth fret, then I must lower the saddle by 1/32." A simple piece of trigonometry leftover from high school!
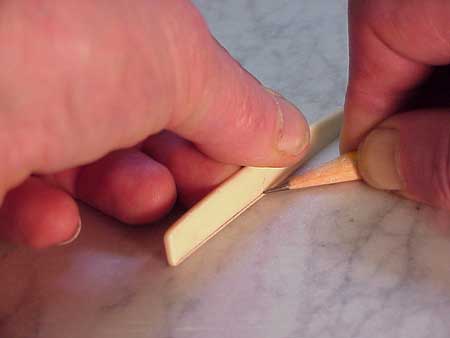
I'll take the strings off, and grip the saddle with a pair of pliers, and remove it. Then, going over to my flat surface (here, a piece of marble tile, at home, a countertop) I'll hold a sharp pencil right up to my rule at the 1/32" mark:
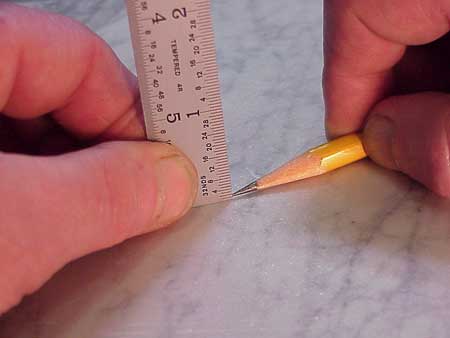
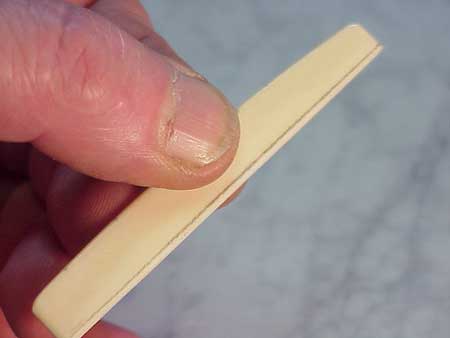
Keeping the pencil steady, I'll simply rub the saddle against the point, giving me a perfect line at exactly the height I want: